

Taking a manual blood pressure reading is a skill that requires the right equipment, correct positioning, and a steady ear. You measure it using a sphygmomanometer (the cuff and gauge) and a stethoscope, listening for two distinct sounds that mark your systolic and diastolic pressures. The process takes about two minutes, and accuracy depends heavily on preparation and technique, not just the equipment itself.
What Equipment Do You Need?
You need a properly sized blood pressure cuff and an aneroid sphygmomanometer, which is the device with a circular gauge. You also need a stethoscope with a chest piece that fits comfortably in your ears.
Cuff size matters more than most people realize. A cuff that is too small can raise the reading by 10 to 40 mmHg. A cuff that is too large can lower it. The bladder inside the cuff—the inflatable part—should wrap around at least 80 percent of the upper arm’s circumference. For most adults, a standard cuff works, but larger and smaller sizes exist. Measure your arm circumference or have a clinician do it if you are unsure.
An aneroid gauge needs periodic calibration. If you are using one at home, compare it against a device at your doctor’s office once a year. A mercury column is the gold standard but is rarely used outside clinical settings now.
How Do You Prepare the Person Being Measured?
Preparation directly affects the numbers you get. The person should sit quietly for at least five minutes before you start. They should not have smoked, exercised, or consumed caffeine in the 30 minutes prior. A full bladder can raise blood pressure, so a bathroom trip beforehand is wise.
Positioning is straightforward but easy to get wrong. Have the person sit in a chair with their back supported and both feet flat on the floor. Do not cross the legs. The arm being measured should rest on a flat surface at heart level—roughly the level of the lower edge of the breastbone. If the arm hangs below heart level, the reading will be falsely high. If it is raised above heart level, the reading will be falsely low.
The arm should be bare or covered only by a thin sleeve. A thick sleeve can compress the arm and distort the reading. Roll up the sleeve if needed, but avoid tight fabric bunching above the cuff.
Step-by-Step: How To Do A Manual Blood Pressure Reading
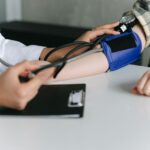
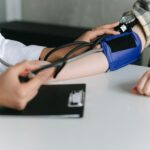
Place the cuff on the bare upper arm, about one inch above the bend of the elbow. The bottom edge of the cuff should sit just above the crease. The tubing should align with the brachial artery, which runs along the inner side of the arm. Wrap the cuff snugly but not tight—you should be able to slide one fingertip under the edge.
Find the brachial artery pulse. Place your fingers on the inner arm, just above the elbow crease. You should feel a clear pulse. Position the flat part of the stethoscope directly over this pulse point. Hold it in place with light pressure—pressing too hard can distort the sound.
Close the valve on the inflation bulb by turning it clockwise. Inflate the cuff quickly by squeezing the bulb. Watch the gauge as you do. Inflate to about 30 mmHg above the point where the pulse disappears. If you do not know the person’s usual blood pressure, inflate to 160 to 180 mmHg and check for the pulse. If the pulse is still present, inflate higher.
Open the valve slightly to release air. The needle should fall at a steady rate of about 2 to 3 mmHg per second. Too fast and you will miss the first sound. Too slow and the arm becomes congested, which can raise the diastolic reading.
Listen carefully. The first faint tapping sound you hear is the systolic pressure. Note the number on the gauge at that exact moment. The sounds will continue, becoming louder then muffled. The point where the sounds disappear completely is the diastolic pressure. Note that number. Continue listening for another 10 to 20 mmHg to confirm the sounds have truly stopped, then release the remaining air quickly.
Record both numbers immediately—systolic over diastolic, such as 120/80. Never rely on memory. Write it down or enter it into a log.


What Are the Korotkoff Sounds and Why Do They Matter?
The sounds you hear through the stethoscope are called Korotkoff sounds, named after the Russian physician who described them in 1905. They are not the pulse. They are vibrations created by blood flow as the cuff pressure falls between systolic and diastolic levels.
When the cuff is fully inflated, it completely blocks the brachial artery. No blood flows through. As the pressure drops, blood begins to push through the compressed artery at the peak of each heartbeat. This turbulent flow creates the first tapping sound—phase one. That first tap is your systolic reading.
As pressure continues to fall, the sounds change character. They become softer, then louder, then muffled. The point where they become muffled is phase four. The point where they disappear entirely is phase five. In adults, phase five is used as the diastolic reading. In some conditions—pregnancy, high cardiac output states, or aortic regurgitation—the sounds may never fully disappear. In those cases, clinicians sometimes use phase four, the muffling point, as the diastolic. This is a clinical judgment call, not a routine practice.
Understanding these phases helps you avoid a common error: recording the muffling point as diastolic when the sounds actually continue for several more mmHg. Always wait for complete silence.
What Mistakes Most Often Skew the Reading?
The most common errors are all avoidable. Cuff size is the biggest offender. Using a standard cuff on a large arm gives falsely high readings. Using a standard cuff on a small arm gives falsely low readings.
Arm position is the second most common error. The arm must be at heart level. If it rests in the lap or hangs at the side, the reading can be 5 to 10 mmHg higher than the true value. If it is elevated on a pillow, the reading can be falsely low.
Deflating the cuff too quickly is another frequent mistake. If the needle drops faster than 3 mmHg per second, you will likely miss the first Korotkoff sound and record a systolic that is too low. The diastolic can also be affected because the sounds may disappear before you register the true endpoint.
Talking during the measurement can raise the reading by 10 mmHg or more. The person should remain silent and still. Even a clenched fist or tensed arm muscles can inflate the numbers.
Taking the measurement on an arm that has been used recently for exercise or intravenous access can give misleading results. Use the other arm if possible, or rest the arm for several minutes before measuring.
When Should You Repeat the Reading?
A single reading is rarely enough for a clinical decision. Blood pressure fluctuates naturally throughout the day in response to stress, activity, meals, and even breathing. If the first reading is elevated, wait one to two minutes and take a second reading on the same arm. The cuff should be fully deflated and the arm rested during this interval.
If the two readings differ by more than 5 mmHg, take a third reading. Use the average of the readings as the recorded value. This averaging reduces the impact of moment-to-moment variation.
If you are measuring both arms, do this at the first visit. A difference of more than 10 mmHg between arms warrants a medical evaluation, as it can indicate arterial narrowing. Use the arm with the higher reading for all future measurements.
At home, measure at the same times each day—typically morning before medication and evening before dinner—to get a consistent picture. Keep a log and bring it to your appointments.
How Accurate Is Manual Measurement Compared to Automatic Devices?
Manual measurement with proper technique is accurate and is the standard against which automatic devices are validated. But it has real limitations. It requires training, good hearing, and careful attention to the deflation rate. An untrained person can easily produce readings that are off by 10 mmHg or more.
Automatic devices remove the need for a stethoscope and the skill of listening. They are convenient and reduce observer error. However, they have their own limitations. They can be inaccurate in people with irregular heart rhythms, such as atrial fibrillation. They may also give inconsistent results if the cuff is not positioned correctly or the arm is not at heart level.
Some research suggests that automatic devices can overestimate or underestimate blood pressure depending on the individual and the device. The only way to know if your home device is accurate is to bring it to a clinic and compare its readings against a manual measurement taken on the same arm at the same time.
For most people, a validated automatic device is fine for home monitoring. But if you are measuring for a specific medical reason—titrating medication, evaluating symptoms, or confirming a diagnosis—manual measurement by a trained professional remains the reference standard.
When Should You Seek Medical Attention?
Manual blood pressure measurement is a screening tool, not a diagnosis. One elevated reading does not mean you have hypertension. Blood pressure varies, and a single high number can reflect stress, pain, or poor technique.
If you consistently measure above 130/80 mmHg at home, discuss this with your doctor. If you measure above 180/120 mmHg and have symptoms like chest pain, shortness of breath, vision changes, or severe headache, seek emergency care immediately. A reading that high with symptoms is a hypertensive emergency.
If you measure above 180/120 mmHg but feel fine, wait five minutes and recheck. If it remains that high, contact your doctor the same day. Do not assume that the absence of symptoms means everything is fine.
Home monitoring is a tool for tracking trends over time. It does not replace regular checkups. Your doctor can interpret your readings in the context of your overall health, medications, and risk factors.
Frequently Asked Questions
How long should I wait between blood pressure readings?
Wait one to two minutes between readings on the same arm.
The cuff should be fully deflated and the arm relaxed during this time.
Why is my home blood pressure reading different from the doctor’s office reading?
Blood pressure naturally varies throughout the day, and the stress of a clinic visit can raise it.
Home readings taken under calm conditions often run lower than office readings, which is why doctors rely on home logs for medication decisions.
Can I take my own blood pressure with a manual cuff?
Yes, but it is difficult because you must inflate the cuff, control the valve, and listen for sounds simultaneously.
Most people find it easier to have someone else take the measurement, or to use a validated automatic device for self-monitoring.
Which arm should I use for blood pressure measurement?
Use the arm with the higher reading if you have checked both arms and found a difference.
If both arms are equal, use your non-dominant arm for consistency.
