

Checking your blood pressure manually takes about five minutes and a cuff, a stethoscope, and a quiet room. You wrap the cuff around your bare upper arm, inflate it until blood flow stops, then release the air slowly while listening through the stethoscope for two specific sounds. Those two sounds — the first one and the point where they disappear — give you your systolic and diastolic numbers. Done correctly, a manual reading can be as accurate as an automated one, and sometimes more accurate for people whose automated monitors give inconsistent results.
What Equipment Do You Need to Check Blood Pressure Manually?
You need three things: a blood pressure cuff, a stethoscope, and a gauge. Most manual kits combine the cuff and gauge into one unit, often called a sphygmomanometer (sfig-mo-mah-NOM-eh-ter).
The cuff size matters more than most people realize. A cuff that is too small will give a falsely high reading. Too large, and the reading may come out falsely low. The American Heart Association recommends measuring your mid-arm circumference and choosing a cuff whose bladder length wraps around roughly 75 to 80 percent of your arm. If you are between sizes, go larger.
You also need a stethoscope with a bell or diaphragm. Either works for blood pressure. The bell tends to pick up the low-pitched Korotkoff sounds slightly better, but in practice both are used.
An aneroid gauge — the dial type — needs to be calibrated periodically. If the needle does not rest at zero before you start, the gauge is out of calibration and your readings will be off. Mercury gauges are rarely used now because of mercury toxicity concerns, but they were long considered the gold standard. Digital gauges built into automated monitors remove the need for a stethoscope entirely, but that is a different method.
How To Check Blood Pressure Manually Step by Step
Here is the full procedure. It follows the standard technique taught in clinical settings.
- Rest first. Sit quietly for at least five minutes before starting. No talking, no phone, no caffeine in the previous 30 minutes.
- Position your arm. Sit with your back supported and feet flat on the floor. Rest your bare upper arm on a table so the cuff sits at roughly heart level. If the arm is below heart level, the reading tends to run high. Above heart level, it tends to run low.
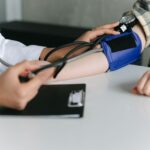
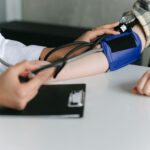
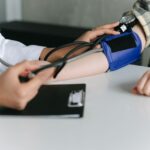
- Wrap the cuff. Place the cuff on bare skin, not over a sleeve. The bottom edge should sit about one inch above the bend of your elbow. The tubing should run down the front of your arm over the brachial artery, which is the main artery on the inner side of your elbow.
- Find your pulse. Press your fingertips into the crook of your elbow on the inner side until you feel a pulse. That is roughly where the brachial artery runs. Place the stethoscope earpieces in your ears and press the stethoscope head firmly over that spot, but not so hard that you press the artery shut.
- Inflate. Close the air valve on the bulb and squeeze the bulb to inflate the cuff. Watch the gauge. Pump until the needle reads about 30 mmHg above your usual systolic pressure, or about 180 to 200 mmHg if you do not know your usual number. At this point you should hear nothing through the stethoscope.
- Release slowly. Open the valve just enough that the needle falls at about 2 to 3 mmHg per second. This slow, steady release is what makes the reading reliable.
- Listen for the first sound. The first clear tapping sound you hear is your systolic pressure. Note the number on the gauge at that exact moment.
- Listen for the last sound. Keep listening as the tapping continues, softens, and eventually disappears. The point where the sound vanishes completely is your diastolic pressure. Note that number.
- Deflate fully and record. Open the valve all the way and let the remaining air out. Write down both numbers.
Wait at least one minute and repeat. Take two or three readings and average them. Single readings can be misleading, and the first one is often the highest.
What Do the Korotkoff Sounds Actually Mean?
When you inflate the cuff above your systolic pressure, you squeeze the brachial artery shut. No blood flows through, so you hear nothing. As you release air, pressure in the cuff drops. Once cuff pressure falls just below the pressure your heart generates when it contracts, blood starts pushing through the partially compressed artery. That turbulent flow creates the tapping sound you hear — the first Korotkoff sound.
As cuff pressure keeps dropping, the sounds change. They may become louder, then softer, then muffled. Eventually the artery is no longer compressed at all, flow becomes smooth and silent, and the sounds disappear. That is the fifth Korotkoff sound, and it marks diastolic pressure in adults.
There is a long-standing debate about whether to use the muffling point (fourth sound) or the disappearance point (fifth sound) as diastolic in certain groups. In adults, the disappearance point is standard. In some clinical situations, such as pregnancy or in children, clinicians may note both. This is one reason manual readings require training to interpret consistently.
A detail worth knowing: the Korotkoff sounds are not the sound of your heart beating. They are the sound of turbulent blood flow through a partially compressed artery. That distinction matters because it explains why the technique works at all.

What Mistakes Cause Wrong Blood Pressure Readings?
Most inaccurate manual readings come from a handful of avoidable errors.
Releasing the valve too fast. If the needle drops faster than about 2 to 3 mmHg per second, you can miss the exact point where sounds start and stop. Your reading may be off by several points.
Cuff over clothing. A sleeve adds thickness that changes how pressure transmits to the artery. Readings taken over clothing tend to run high.
Arm position. An arm hanging at your side instead of resting at heart level can shift the reading noticeably. So can an unsupported back or crossed legs.
Talking during the reading. Talking raises blood pressure temporarily. Even answering a question mid-cuff can push the number up.
Wrong cuff size. As noted earlier, too small a cuff reads high. This is one of the most common errors in home settings.
Not resting beforehand. Walking in from another room and immediately taking a reading will usually produce a higher number than a true resting value.
Deflating and reinflating without a pause. If you miss the sounds and immediately pump back up, blood can pool in the arm and distort the next reading. Wait at least one minute.
How Accurate Is Manual Blood Pressure Compared to a Machine?
Manual measurement with a properly calibrated aneroid gauge and good technique is accurate. It has been the clinical reference method for decades. Automated oscillometric monitors — the kind with a digital display and no stethoscope — are also accurate for most people and are what you will see in many clinics and homes.
However, automated monitors can give unreliable readings in certain situations. These include people with irregular heart rhythms such as atrial fibrillation, people with very stiff arteries, and people whose blood pressure fluctuates rapidly. In those cases, manual auscultation may be more reliable — but only if the person taking the reading has good technique.
One practical point: aneroid gauges drift out of calibration over time. A gauge that reads 5 to 10 mmHg off will give you consistently wrong numbers without any obvious sign. Many clinics check their gauges annually. Home users rarely do. If your manual readings consistently disagree with a trusted automated monitor or with clinic readings, suspect the gauge.
Mercury sphygmomanometers were long considered the gold standard because they do not drift. They are now largely phased out in clinical practice due to mercury handling and disposal concerns. This is why calibration of aneroid devices matters more than it used to.
When Should You Not Rely on Home Manual Readings?
Home blood pressure monitoring is useful for tracking trends over time. It is not a substitute for clinical evaluation when something is wrong.
Seek medical care rather than self-monitoring if you have a reading at or above 180/120 mmHg, especially with symptoms such as chest pain, shortness of breath, severe headache, vision changes, or weakness on one side of the body. That range is considered a hypertensive crisis and needs prompt evaluation.
Also see a clinician if your home readings are consistently high but you feel fine. High blood pressure usually causes no symptoms until it has done damage, which is exactly why it is called the silent killer.
If you take blood pressure medication, do not adjust your dose based on home readings alone. Bring your log to your clinician and let them interpret the pattern. Home readings are one data point among several, including office readings and sometimes ambulatory monitoring over 24 hours.
Finally, if you have never been taught the technique in person, consider asking a nurse or pharmacist to watch you do it once. Manual blood pressure measurement looks simple and is not. Small errors in cuff placement, inflation speed, and release rate add up. A single supervised session can correct habits you did not know you had.
Frequently Asked Questions
Can I check my own blood pressure manually without help?
Yes, but it is harder than it looks because you have to inflate the cuff, hold the stethoscope in place, and watch the gauge at the same time. Many people manage it with practice, but a second person usually gets more reliable results.
What is the correct cuff size for manual blood pressure?
The cuff bladder should wrap around about 75 to 80 percent of your mid-arm circumference, per American Heart Association guidance. If you are between sizes, choose the larger cuff, since a too-small cuff reads falsely high.
Why can’t I hear the Korotkoff sounds when checking blood pressure?
Common reasons include a stethoscope placed off the artery, background noise, releasing the valve too quickly, or inflating the cuff too little. Try pressing the stethoscope head more firmly over the brachial pulse and releasing the air more slowly.
Is a manual blood pressure reading better than a digital one?
Neither is automatically better. Manual readings depend heavily on technique and gauge calibration, while automated monitors remove technique errors but can be less reliable for people with irregular heart rhythms or stiff arteries.
