
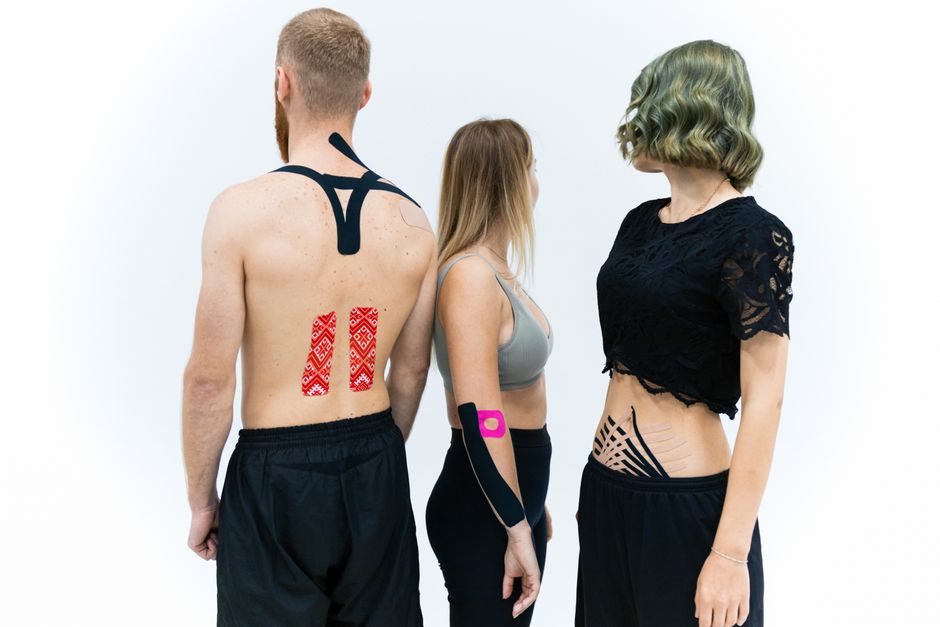
Kinesiology tape is an elastic cotton tape used to support muscles and joints without restricting movement. It works by lifting the skin slightly, which can improve blood flow and reduce pressure on pain receptors. You apply it along a muscle or around a joint, and the tape’s stretch provides gentle support while you move normally.
How Does Kinesiology Tape Actually Work?
The tape’s main effect comes from its elasticity. When applied correctly, the tape lifts the top layer of skin away from the tissue beneath it. This creates a small space that improves circulation and lymphatic drainage in the area.
This lifting effect also reduces pressure on pain receptors in the skin. Some research suggests this is why people feel pain relief shortly after application. The tape does not provide structural support like athletic tape or a brace. It works through sensory feedback rather than physical restriction.
There is ongoing debate about how much of the benefit comes from the tape itself versus the placebo effect. Some studies show meaningful pain reduction, while others show minimal difference compared to sham taping. The evidence is strongest for short-term pain relief and improved range of motion, not for long-term healing.
What You Need Before Applying Kinesiology Tape
Gather the right supplies before you start. You need kinesiology tape, scissors, and clean, dry skin. Avoid lotions, oils, or moisturizers on the skin before application — they prevent the tape from sticking properly.
Choose the correct tape width. Most brands sell 2-inch rolls, which work well for most body areas. The 1-inch width works better for fingers, toes, and smaller muscles. Some brands offer pre-cut strips for specific body parts.
Trim any hair in the area if needed. Hair reduces adhesion and makes removal painful. Do not shave right before applying — shaving can create tiny cuts that may become irritated.
How To Use Kinesiology Tape For Pain And Support: Step-by-Step
Follow these steps for a basic application. The exact technique varies by body part, but the fundamentals stay the same.
Step 1: Measure and cut. Cut a strip long enough to cover the painful area plus about two inches of healthy tissue on each end. Round the corners with scissors. Rounded corners prevent the tape from peeling off early.
Step 2: Prepare the anchor. Peel the backing paper off the first two inches of tape. Do not stretch this anchor section. Place it on the skin at one end of the area you are treating.
Step 3: Apply with the correct tension. Peel the rest of the backing as you go. The amount of stretch depends on your goal. For general pain relief, use about 25 to 50 percent stretch. For muscle support, use less stretch. For lymphatic drainage, use almost no stretch.
Step 4: Finish with a relaxed tail. Leave the last two inches unstretched. Press the final anchor down firmly. Rub the entire strip vigorously for about 30 seconds. The heat from friction activates the adhesive.
Step 5: Check the fit. The tape should feel secure but not tight. You should not feel any pinching or restriction. If you feel discomfort, remove and reapply with less tension.
For joint pain, like a knee or shoulder, wrap the tape around the joint rather than along a muscle. For muscle pain, run the tape along the length of the muscle from origin to insertion.




Common Application Patterns for Different Body Areas
Different body parts require different taping approaches. Here are the most common patterns.
Knee pain: Cut two strips. Apply the first strip vertically from above the kneecap to below it, with the knee slightly bent. Apply the second strip horizontally across the kneecap. This creates a supportive cross pattern.
Shoulder pain: Cut one long strip. Anchor it at the top of the shoulder near the neck. Run it down the outside of the arm toward the elbow with moderate stretch. Apply a second strip across the shoulder blade area if needed.
Lower back pain: Cut two or three strips. Apply them horizontally across the lower back, parallel to each other, with the spine in the center. Use moderate stretch on the middle section and no stretch on the anchors.
Neck pain: Cut strips and apply them vertically along the neck muscles. Use light stretch only. The neck has sensitive skin and thin tissue, so be conservative with tension.
Ankle support: Apply strips vertically on both sides of the ankle, running from the lower leg down to the foot. Add a horizontal strip around the ankle joint for extra stability.
These patterns cover the most common uses. If you have a specific injury, consider consulting a physical therapist for a personalized taping strategy.
How Long Should You Wear Kinesiology Tape?
Kinesiology tape is water-resistant and can stay on for three to five days. Some people wear it longer, but the adhesive degrades over time. The tape is designed to be worn during showers, exercise, and daily activities.
Change the tape when it starts to peel at the edges or lose its elastic feel. Do not leave tape on if it causes skin irritation, itching, or a rash. Remove it immediately if you notice any redness or blistering.
For acute injuries, you may need to reapply every few days for one to two weeks. For chronic conditions, some people use tape intermittently during flare-ups. There is no standard recommendation for how long to use tape overall — it depends on your symptoms and response.
Does Kinesiology Tape Work for All Types of Pain?
Kinesiology tape works best for musculoskeletal pain — muscle strains, joint discomfort, and post-injury pain. Research shows the most consistent benefits for shoulder pain, particularly rotator cuff issues. Some studies also support its use for knee osteoarthritis and lower back pain.
The tape is less effective for nerve pain, bone pain, or pain from internal conditions. If your pain is severe, worsening, or accompanied by numbness, weakness, or fever, see a healthcare provider. Tape is not a substitute for medical evaluation.
Evidence for performance enhancement is weak. Some athletes use kinesiology tape believing it improves strength or endurance. Studies have not confirmed these effects. The tape may help proprioception — your body’s awareness of joint position — but this does not translate to measurable performance gains.
Risks and Limitations You Should Know
Kinesiology tape is generally safe for most people. The most common side effect is skin irritation from the adhesive. People with sensitive skin, allergies to acrylic adhesives, or skin conditions like eczema should use caution.
Do not apply tape over open wounds, rashes, or sunburned skin. Avoid using it on areas with poor circulation or where you have lost sensation. If you have diabetes or peripheral vascular disease, talk to your doctor before using kinesiology tape.
Pregnant women should avoid taping over the abdomen. No clinical guidelines currently exist for tape use during pregnancy. The evidence for safety in this population is limited.
The tape will not fix the underlying cause of your pain. It is a supportive tool, not a treatment. If pain persists beyond a few weeks or interferes with daily life, seek professional evaluation.
Frequently Asked Questions
How tight should kinesiology tape be?
The tape should feel secure but never tight or restrictive. You should not feel any pinching, and your movement should remain full and unrestricted.
Can I shower with kinesiology tape on?
Yes, kinesiology tape is water-resistant and designed to stay on through showers and swimming. Pat it dry gently afterward rather than rubbing it.
Does kinesiology tape actually relieve pain or just mask it?
Evidence shows it can reduce short-term pain by lifting the skin and reducing pressure on pain receptors. It does not treat the underlying injury.
Can I sleep with kinesiology tape on?
Yes, you can sleep with the tape on. Most people forget they are wearing it after a few hours. If it causes discomfort at night, remove it.
