
Making royal jelly at home is a precise process that starts with grafting young larvae into queen cups and ends with harvesting a small, creamy substance from the cells about three days later. It is not a casual hobby — it requires a strong colony, careful timing, and steady hands. But for beekeepers who want full control over their apiary, it is one of the most rewarding skills to learn.
What Is Royal Jelly and Why Do Bees Make It?
Royal jelly is a thick, milky secretion produced by young worker bees. Nurse bees make it from glands in their heads and feed it to all larvae for the first three days of life. After that, only larvae destined to become queens continue receiving it.
This diet change is what makes a queen bee different from a worker. Both start as genetically identical eggs. The queen develops fully functional ovaries and lives for years because she is fed royal jelly exclusively. Workers, fed a mix of pollen and honey after day three, live only weeks during the active season.
For beekeepers, royal jelly is harvested for its use in dietary supplements, cosmetics, and traditional medicine. The global demand is steady, and a single strong colony can produce a modest but meaningful amount each season.
How To Make Royal Jelly From Grafting To Harvest: The Core Process
The entire process from grafting to harvest takes about 72 hours. You start with a strong, healthy colony and a separate “cell builder” colony that will raise the grafted larvae as queens.
First, you graft. This means transferring a very young larva — less than 24 hours old — from its worker cell into an artificial queen cup. The larva must float in a drop of royal jelly taken from an existing queen cell. This keeps it moist and gives it a head start.
Next, you place the frame of grafted cups into the cell builder colony. This colony should be crowded, well-fed, and queenless or have a queen confined to one area. A strong cell builder will accept the grafted larvae and begin feeding them heavily.
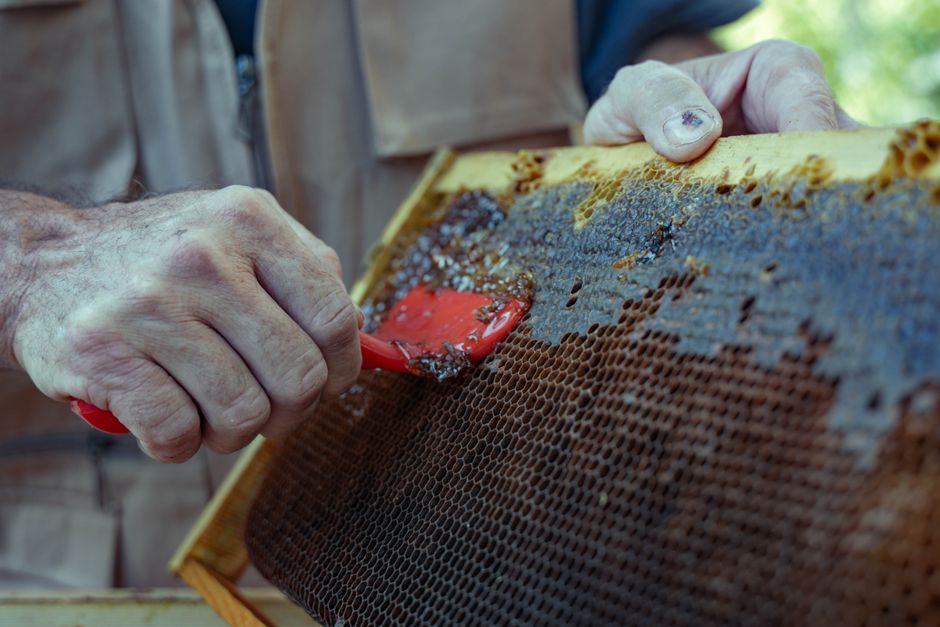
After 72 hours, the queen cells will be full of royal jelly. You remove the frame, carefully cut the cells open, and scoop out the jelly. It is a delicate job. The jelly sits at the bottom of the cell with the larva floating on top. You must remove the larva first without breaking it, then collect the jelly.
Timing matters more than anything. Wait too long and the larva consumes the jelly. Harvest at day three, and you get the maximum yield.
What Equipment Do You Need To Harvest Royal Jelly?
You do not need expensive laboratory equipment to start. But you do need several specific tools that most beekeepers do not already own.
- Queen cups — plastic or wax cups shaped like natural queen cells
- A grafting tool — a fine, flexible spatula or a specialized grafting needle
- A cell builder colony — a strong hive set up to accept and feed grafted larvae
- A frame designed to hold queen cups
- A small, clean container with a lid for the harvested jelly
- A magnifying lamp or good lighting for seeing tiny larvae
The grafting tool is the most important piece. A good one has a tiny spoon or fork at the tip that can slide under a larva without crushing it. Larvae are smaller than a grain of rice and extremely fragile.
You also need a cool, clean workspace. Royal jelly spoils quickly at room temperature. Harvest it into a glass jar and refrigerate it immediately. If you plan to store it long-term, freezing is the standard method.

How To Set Up a Strong Cell Builder Colony
The cell builder colony is the engine of your operation. Without a strong one, your grafted larvae will be rejected or poorly fed, and your yield will be tiny.
A good cell builder has at least eight to ten frames of bees, plenty of young nurse bees, and abundant stored pollen and honey. Many beekeepers feed their cell builder sugar syrup and a protein supplement for several days before grafting. This stimulates the nurse bees to produce more royal jelly.
The colony should be queenless. When bees have no queen, they are desperate to raise a new one. Grafted larvae in queen cups look like a perfect opportunity, so the nurses feed them intensely. Some beekeepers use a queen excluder to keep the queen in one part of the hive while the grafted frame sits in the other part. This works but is generally less effective than a fully queenless setup.
Once the grafted frame is in the cell builder, leave the colony alone for 72 hours. Opening the hive too often disturbs the bees and reduces acceptance rates.
How To Graft Larvae Correctly
Grafting is the skill that separates successful royal jelly producers from those who give up after one season. It takes practice, and your first few attempts will likely have low acceptance rates.
Start by finding a frame with very young larvae. Look for cells with a tiny, C-shaped larva floating in a pool of milky white food. The larva should be no larger than a grain of rice. If it is curled into a full circle, it is too old.
Use your grafting tool to gently scoop the larva along with a small amount of the royal jelly it is already sitting in. Transfer it directly into a queen cup. The larva must stay in contact with food at all times. If it dries out, even for a few seconds, it will die.
Work quickly but carefully. A skilled grafter can move 50 to 100 larvae per hour. Beginners should aim for fewer — quality over quantity. A poorly grafted frame with 20 healthy larvae is better than a rushed frame with 50 dead ones.
After grafting, place the frame into the cell builder immediately. Do not leave grafted cups sitting out while you finish other tasks.
How To Harvest Royal Jelly Safely and Cleanly
On day three, remove the grafted frame from the cell builder. Gently brush off any bees. Take the frame to a clean indoor workspace — not outside where dust and insects can contaminate the jelly.
Using a sharp knife or a specialized cell cutter, slice the top off each queen cup. The larva will be floating on the surface of the jelly. Remove it with your grafting tool or a pair of fine forceps. Discard the larva.
Then, scoop out the royal jelly with a small spatula or a purpose-made harvesting spoon. Place it directly into your collection jar. Work cell by cell, and keep the jar covered as much as possible.
Royal jelly is sensitive to light, heat, and air. It oxidizes quickly, which changes its color and reduces its quality. Harvest in small batches, keep the jar on ice if possible, and refrigerate it within minutes of finishing.
Cleanliness is critical. Royal jelly is a food product. Any contamination from wax, larval tissue, or dirty tools will shorten its shelf life and could make it unsafe to consume.
How Much Royal Jelly Can One Colony Produce?
Expect modest yields. A single strong cell builder colony might produce 50 to 100 grams of royal jelly per season if you run multiple grafting cycles. That is roughly two to four ounces.
Each queen cup yields about 0.2 to 0.3 grams of royal jelly. A frame with 60 accepted grafts gives you roughly 12 to 18 grams per harvest. You can run a new grafting cycle every five to seven days, but the colony needs time to recover between cycles.
Commercial royal jelly producers use hundreds of colonies and specialized breeding lines to make production worthwhile. For a hobby beekeeper, royal jelly is best treated as a small-scale specialty product — not a major income source.
Common Mistakes Beginners Make
The most common mistake is grafting larvae that are too old. Larvae older than 24 hours are larger and easier to see, but the bees will not feed them as queens. Your acceptance rate will drop dramatically.
The second most common mistake is a weak cell builder colony. If the colony is not crowded, well-fed, and queenless, it will simply ignore the grafted cups. You will open the hive on day three to find empty cells.
The third mistake is harvesting too late. If you leave the cells for five or six days, the larva will have consumed the jelly. You will open the cell to find a fully formed queen pupa and nothing to harvest.
Finally, many beginners contaminate their harvest by not removing the larva cleanly. If the larva breaks, its body fluids mix with the jelly. This ruins the batch for human consumption.
How To Store Royal Jelly Properly
Royal jelly is perishable. At room temperature, it degrades within hours. In a refrigerator at 4°C (39°F), it can last for several weeks. In a freezer at -18°C (0°F) or colder, it can be stored for months.
Some beekeepers mix royal jelly with honey to extend its shelf life. Honey acts as a preservative, but it also dilutes the royal jelly. If you want pure royal jelly, freezing is the only reliable method.
Always store royal jelly in a dark glass jar with an airtight lid. Light and oxygen degrade its active compounds. Label the jar with the harvest date so you know how old it is.
Is It Legal To Sell Royal Jelly?
In the United States, royal jelly is sold as a dietary supplement, not as a food or drug. That means it is regulated by the FDA under supplement rules, which are less strict than food regulations.
If you sell royal jelly, you must label it accurately. You cannot make medical claims about what it does. Statements like “boosts immunity” or “cures allergies” are not allowed without clinical evidence.
Some states have additional requirements for selling bee products. Check with your state’s department of agriculture before you sell anything.
Frequently Asked Questions
How long does it take to make royal jelly from grafting to harvest?
About 72 hours from grafting to harvest. The bees need three full days to feed the larva and fill the queen cup with royal jelly.
Do I need a queenless colony to produce royal jelly?
Yes, a queenless colony is the most effective cell builder. Bees without a queen are strongly motivated to raise new queens and will feed grafted larvae intensively.
Can I harvest royal jelly without killing the larva?
No, the larva must be removed from the cell during harvest. It is discarded. This is standard practice in royal jelly production.
How much royal jelly can I expect from one grafting session?
Each accepted queen cup yields about 0.2 to 0.3 grams of royal jelly. A frame with 60 accepted grafts gives roughly 12 to 18 grams per harvest.
