
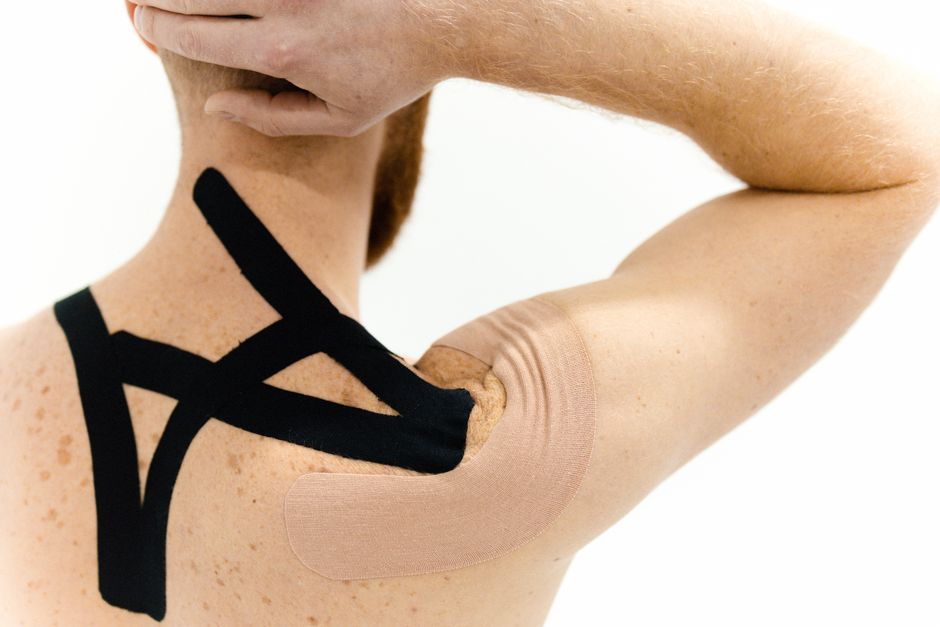
Applying KT tape to the trapezius muscle can help reduce pain and improve movement, but the technique depends on whether the problem is in the upper, middle, or lower part of the muscle. For the most common issue—upper trapezius tightness and neck pain—the tape is applied from the shoulder, running upward along the muscle toward the base of the skull. The skin must be clean, dry, and free of lotion, and the tape should be applied without stretching the ends so it stays put. Before you tape, it is wise to check with a healthcare provider to confirm the source of your pain, since shoulder and neck discomfort can come from many structures.
What Is the Trapezius Muscle and Why Does It Get Tight?
The trapezius is a large, flat muscle that covers the upper back, neck, and shoulders. It has three main sections: the upper fibers lift the shoulder blades, the middle fibers pull them together, and the lower fibers pull them down. This muscle is involved in nearly every arm and neck movement, which makes it prone to overuse and strain.
Tightness in the upper trapezius is common in people who sit at desks, look down at phones, or carry heavy bags on one shoulder. Stress also plays a role, as many people hold tension in their neck and shoulders without realizing it. When the muscle stays contracted for long periods, it can feel hard, tender, and painful to move.
Kinesiology tape was developed to support muscles without restricting movement. The theory is that lifting the skin slightly creates more space under the surface, which may improve blood flow and reduce pressure on pain receptors. Clinical evidence for this mechanism is limited, but many physical therapists use the tape as part of a broader treatment plan.
How To Apply KT Tape To The Trapezius Muscle: Step-by-Step
Start with clean, dry skin. Shower first and remove any lotion, oil, or sweat from the area. If you have body hair, shave the area where the tape will go, or the tape will pull painfully when removed.
You will need two strips of tape. The first strip is the main support for the upper trapezius. Cut a piece long enough to reach from the top of your shoulder to the base of your skull—usually about 8 to 10 inches for most adults. Round the corners with scissors to prevent the tape from peeling off early.
Sit or stand with your head tilted slightly toward the opposite side. This stretches the muscle you are taping, which makes it easier to apply the tape correctly. Place one end of the tape at the top of the shoulder, near the edge of the shoulder joint. Do not stretch this anchor end. Rub it down gently to activate the adhesive.
Now, stretch the tape to about 50 to 75 percent of its full length and lay it along the muscle, moving upward toward the base of the skull. The muscle runs from the shoulder up the side of the neck to the back of the head. Smooth the tape down as you go. Leave the final inch at the top of the neck unstretched, and press it down without tension.
For the second strip, you can add a shorter piece horizontally across the upper back if you have pain between the shoulder blade and spine. Apply it with the same method: anchor one end without stretch, pull the tape to moderate tension, lay it across the muscle, and finish with an unstretched end.
Rub the entire taped area with your palm for 30 seconds. The heat from friction helps the adhesive bond to the skin. The tape can stay on for two to five days, depending on your skin sensitivity and activity level.
How Tight Should the Tape Be?
This is where most people make mistakes. The tape should never be stretched at the very ends. Only the middle section of the tape carries tension. If you stretch the ends, the tape will pull on the skin and cause irritation or blisters.
The amount of stretch depends on what you want the tape to do. For muscle support and pain relief, moderate stretch—about 50 to 75 percent—is typical. For a lighter effect, such as improving movement awareness, less stretch is better. Some therapists use no stretch at all in certain techniques.
If the tape feels too tight when you move your neck, it probably is too tight. Remove it and start again with less tension. The tape should feel like a second skin, not like a bandage squeezing your neck.





Common Mistakes To Avoid When Taping the Trapezius
Applying tape to wet or oily skin is the most common error. The adhesive will not bond properly, and the tape will peel off within hours. Always clean and dry the area first.
Another frequent mistake is using tape that is too short. If the tape does not reach the full length of the muscle, it provides little support and may pull unevenly. Measure the strip against your own neck and shoulder before cutting.
Some people place the tape directly over the most painful spot with maximum stretch. This can increase discomfort rather than reduce it. The tape works best when applied along the muscle’s line of pull, not just on the tender point.
Finally, do not leave the tape on for more than five days. The adhesive can irritate the skin, and the muscle needs time without tape to maintain normal skin health. If you develop itching, redness, or a rash, remove the tape immediately.
When Should You Not Use KT Tape on the Trapezius?
KT tape is not appropriate for every type of neck or shoulder pain. If you have an open wound, a skin infection, or a known allergy to the adhesive, do not use the tape. If the skin in the area is sunburned or fragile, the tape can cause further damage.
More importantly, some causes of shoulder and neck pain require medical treatment, not taping. If your pain came on suddenly after an injury, if you have numbness or tingling in your arm or hand, or if you have weakness in your grip, see a healthcare provider first. Pain accompanied by fever, chest pressure, or trouble breathing needs immediate medical attention.
KT tape is a supportive tool, not a cure. It may help with muscle tension and mild strain, but it does not treat underlying conditions such as a herniated disc, arthritis, or nerve compression. If the tape does not reduce your pain within a few days, or if the pain worsens, stop using it and seek professional advice.
Does KT Tape Actually Work for Trapezius Pain?
Research on kinesiology tape is mixed. Some studies show modest benefits for pain relief and range of motion in the short term, while others find no significant difference compared to sham taping or no treatment. The quality of evidence is generally low to moderate.
What most physical therapists agree on is that tape can help with symptom management, but it does not fix the underlying problem. If your trapezius is tight because of poor posture or weak back muscles, the tape may provide temporary relief while you work on strengthening and posture correction.
Some research suggests that the tape’s benefit may come partly from a placebo effect. When people feel supported and believe the tape helps, they often move more confidently and experience less pain. That does not mean the tape is useless—it means its effects are complex and not fully understood.
For best results, combine taping with stretching, strengthening exercises, and ergonomic changes. A physical therapist can show you specific exercises for the trapezius and surrounding muscles. Tape alone is rarely enough to resolve chronic neck and shoulder pain.
How To Remove KT Tape Without Hurting Your Skin
Do not yank the tape off. This can damage the skin and cause bruising. The best method is to apply a small amount of baby oil, cooking oil, or adhesive remover to the tape and let it soak in for a few minutes. This breaks down the adhesive bond.
Then, peel the tape back slowly, keeping one hand flat on the skin to hold it steady. Peel in the direction of hair growth, not against it. If the tape resists, apply more oil and wait longer.
After removal, wash the area with mild soap and water. You may see some redness where the tape was. This is normal and should fade within a few hours. If the redness lasts longer or becomes itchy, you may have a mild adhesive allergy and should avoid using the tape in the future.
Other Ways To Manage Trapezius Tightness
Taping works best as part of a broader approach. Gentle stretching of the neck and shoulders can help release tension. One simple stretch is to tilt your head toward one shoulder and hold for 30 seconds, then repeat on the other side.
Heat therapy, such as a warm shower or a heating pad, can relax the muscle before stretching. Cold therapy, such as an ice pack, may reduce pain and inflammation after activity. Use heat for chronic tightness and cold for recent injuries or flare-ups.
Improving your workstation setup can prevent the problem from returning. Your computer screen should be at eye level, your chair should support your lower back, and your shoulders should stay relaxed while you type. Taking breaks every hour to stand and move can also reduce muscle fatigue.
If you have persistent trapezius pain despite these measures, a physical therapist can assess your posture, strength, and movement patterns. They can identify which muscles are weak or overactive and design a targeted exercise program. Some people benefit from manual therapy, such as massage or trigger point release, to complement their exercise routine.
Frequently Asked Questions
How long can I leave KT tape on my trapezius?
You can leave KT tape on for two to five days, depending on your skin sensitivity and activity level. Remove it sooner if you notice itching, redness, or a rash.
Can I sleep with KT tape on my neck?
Yes, you can sleep with the tape on. The adhesive is designed to hold for several days, and sleeping will not damage the tape or your skin.
Will KT tape help with a pinched nerve in my neck?
KT tape may provide temporary symptom relief, but it does not treat the underlying nerve compression. See a healthcare provider for a proper diagnosis and treatment plan.
Should I stretch before applying KT tape?
You should position the muscle in a stretched position while applying the tape, but you do not need to stretch beforehand. Clean, dry skin is the only preparation required.
